
How to Decoupage Easter Eggs

Are you looking for a fun, easy way to decorate Easter eggs? You can make beautiful, colorful Easter eggs, with leftover materials you have around the house, such as napkins, tissue paper, or stickers. Decoupage eggs can be made with plastic, paper mâché, styrofoam, wooden or real eggs.
I am always drawn to pretty, colorful napkins when I see them. I keep an assortment just in case I need them for special occasions or want to make an ordinary day extra special. There always seems to be 2 or 3 leftover. Making Easter eggs with decoupage is a perfect project to use the extra napkins.
You do not have to use only Easter napkins. Use a variety of napkins with spring, flowers, butterflies, and colorful designs.
I used napkins that had white backgrounds so I did not have to cut the designs out exactly. To make it easier, I just cut around the design not cutting the details. The white background of the napkin blends into the white egg when the Mod Podge was applied.
If using napkins with a colored background, you could use eggs that are the same color, or cut out the design exactly, or just let the background colors overlap and not worry about it.
For this project, I am using white plastic eggs and a large 7 ½” x 6” paper mâché egg. I painted the paper mâché egg with two coats of which acrylic paint and let it dry.
Materials

- Mod Podge
- Eggs
- Napkins, stickers, or tissue paper
- Scissors
- Paintbrush
- Wax Paper
- White acrylic paint – optional
- Clear crystal glitter – optional
- Ribbon, or twine for hangers – optional
Instructions

Most napkins are 2 or 3 ply. Separate the napkin layers, starting from one corner. Gently pull the napkin layers apart. I find it is easiest to separate one edge first, then a second, and then pull the napkin apart.
Cut out your designs from the napkins or tissue paper.
Pick one of the designs and determine where you want it to go on the egg.
Brush a layer of Mod Podge on the area of the egg you want to place the design.
Place the design onto the Mod Podge and pat it down. Use the brush to smooth the shape while brushing on another layer of Mod Podge going from the center of the design out to the edge of the design. Not to worry if it tears a bit. In most cases, you can gently brush it or pat it back in place.


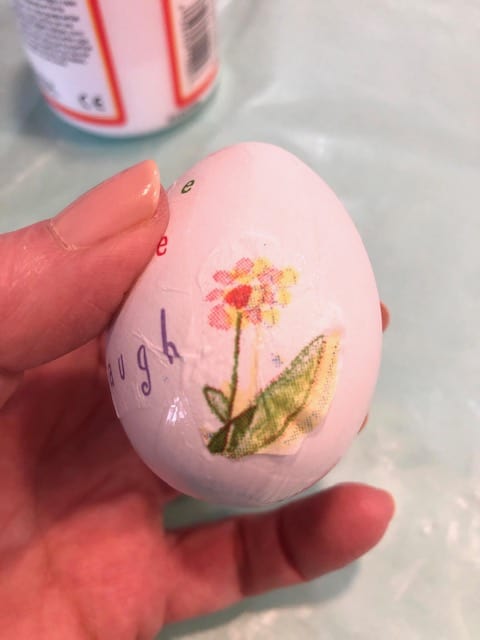


TIP – The design could have a small wrinkle or overlap in a few places as it forms the curve of the egg. When it dries, it may shrink a bit. If the design is larger, you may want to cut a few V-shaped notches in it to get it to form over the curve of the egg.
Continue adding the additional designs to one half of the egg. Let dry, then complete the other half of the egg. When handling the egg, try to avoid holding the egg where you have placed a design until it is dry. The wet design can get stuck to your fingers and tear. The Mod Podge takes only about 20-30 minutes to dry.
TIP: I like to have several eggs ready to work on. While one is drying, I work on another one.
Once the eggs are dry, you can put on an additional coat of Mod Podge, let them dry completely, and add a hanger if needed.
Add Sparkle to Your Decoupage Eggs

For extra sparkle, you can put clear crystal glitter on the eggs. The glitter and glue dry clear so you can still see the design.
To add glitter:
Pour glitter into a shallow bowl or paper plate.
Brush Mod Podge on half of the egg.
Roll in the glitter, coating the Mod Podge.
Set on wax paper or an egg carton to dry.
Repeat with the other half of the egg.
Let dry completely.
After the Mod Podge was completely dry, I firmly rubbed off any loose glitter onto the paper plate.
TIP – When I am done with the glitter, it is easy to fold the paper plate and poured the extra glitter back into the jar to be used next time.
TIP – The paper mâché egg that I used had a flat bottom and backside so I could decide if I wanted it to stand vertically or horizontally. I decided which way I wanted it to stand, and did not put glitter on the flat bottom side of the egg so it would not scratch any surface it was sitting on.


These are an example of some of the napkins I used. The eggs are waiting to dry before I add the finishing touches.


Adding a Hanger
If you are going to hang your eggs, you can hot glue on a hanger using ribbon, cording, twine, etc.
TIP – If you are using styrofoam eggs, you can form you loop with the ribbon and put a straight, flat head pin through the ribbon and into the egg. Just dab a little glue on the egg before you push in the pin so it stays securely in the egg. Another option is to use a decorative pin with a pearl or colored top instead of a straight pin.
You can also use a straight, flat head pin to attach the ribbon to the plastic egg. Make a small hole in the top of the egg using a pearl head corsage pin so you can hold it without getting burned. Using a lit candle or lighter, heat the end of the pin for a few seconds and then holding the pearl head, push it into the top of the egg and quickly remove it.
There will be a very small hole in the egg. Put a small straight pin through your ribbon loop, add a dab of glue and put the pin into the small hole in the egg. Finish off with a small bow in front of the ribbon loop if desired. You can also use a decorative pin instead of the straight head pin.
TIP – If you do not have decorative pins, make your own by layering pearls, beads, sequins, etc. onto a straight head pin.
Hanging Decoupage Easter Eggs
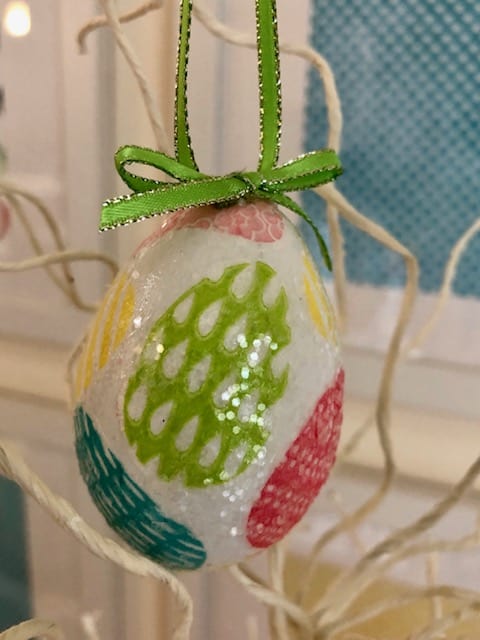


I hope you enjoy making your special decoupage Easter eggs, whether you give them as a gift to your guests, or save them for yourself, they will look so pretty hanging from a tree or in a basket or decorative bowl! Enjoy!
More Fun Projects
Another fun project you can make for Easter or any occasion are the Pretty Paper Globes. For lots of ideas and complete instructions, CLICK HERE
Are you looking for a fun spring art project for your kids? They can paint pretty tulips using forks and add cute thumbprint bugs! For complete directions just CLICK HERE
Happy Spring!
Heartfully,
Sue
P.S. As always, I would love to hear your comments and ideas on how you decorated your Easter eggs!
Hey, I enjoyed reading your posts! You have great ideas. Are you looking to get resources about Airport Transfer or some new insights? If so, check out my website YH9
It is always great to come across a page where the admin take an actual effort to generate a really good article. Check out my website QN7 concerning about Car Purchase.
Your writing style is cool and I have learned several just right stuff here. I can see how much effort you’ve poured in to come up with such informative posts. If you need more input about Website Design, feel free to check out my website at Webemail24
I came across you making the Christmas tree, so pretty! How can I follow your page.